Previous posts in this series are listed in Working in RootsMagic 4 - Summary of Posts.
In this post, I want to explore the Multi-Media function in RootsMagic 4. The RootsMagic 4 Feature List says:
* Improved multimedia handling
* Attach photographs, sound clips, video clips and documents to any person, family, place, source, or event
* Scan photos directly into RootsMagic
* Photo editor lets you adjust sharpness, brightness, contrast, and rotate and zoom images
* Include photos in your books, group sheets, and other printouts
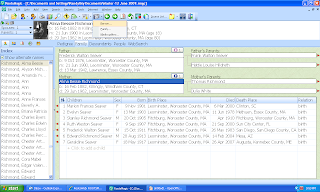
I wanted to add some of the photographs I have on my computer hard drive and also some of the Ancestry.com census images that I've captured to several of my families. I decided to start with my grandparents - Frederick Walton and Alma Bessie (Richmond) Seaver. On the Family View with Frederick highlighted, I highlighted the "Media" icon (the camera) on the icon menu (note that I could not find any other way to add media in the Family or Pedigree view. You can click the "Media" button on the "Edit Person" menu.):

The choices on this menu are Person, Family and Media Gallery. I clicked on Person. The "Media Album" menu opened with buttons to "Add New Media," "Add from Gallery," and others. Since I had no media in my Gallery (I checked), I clicked the "Add New Media" button and the "Add Media Item" menu opened. Here I could select the "Media Type" (Image, file, sound, video), and select to find a media item on the "Disk" (computer hard drive) or "Scan" (I could scan a picture from a scanner):
I chose "Image" and clicked on "Disk" and the Browse menu for my computer files opened. I worked my way to where my Seaver Family images are located, and clicked on the image of my grandparents in their wedding outfits:
The area on the right below the picture shows the pixel count, the color count and the dots per inch count. The information at the bottom of the menu shows the type of file, the file size and the "Mem" size (I'm not sure what that is). The file name and file type are in the Fields near the bottom.
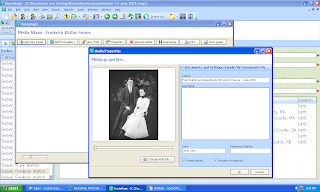
To add this media item to the Gallery and to the Media Album for this person, all you have to do is click on "Open." The Media properties" menu opens and you can type in a Caption, a Description of the media item, a date and a reference number (not sure what this is!). The screen looks like this:

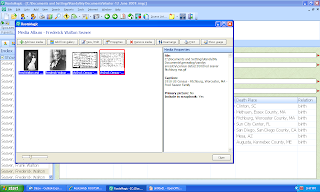
I clicked on "Close" and the media item was added to the "Media Album for Frederick Walton Seaver." That was so easy that I added another picture and two census records to his Media album. When I was done, the Media Album looked like this:

Note that the right hand image is highlighted in red - the Image Properties for that image are summarized on the right side of the Media Album menu.
Next, I wanted to add pictures to my grandmother's Media album. I did that for two of the photos I have of her, but wanted to use the same picture of their wedding and the two census records. To put those images in her Media album, I went to the "Add from Gallery" button on the "Media album" menu and clicked on those items one at a time to add them to her Media Album.
Here is the "Gallery" before I transferred the photo and census images to her "Media album."
After I did this, I realized that I should have attached the wedding photograph and the census records to the "Media album of Frederick Walton Seaver and Alma Bessie Richmond" - that is, the "Family" in the Media icon menu dropdown list, rather than to their individual Media albums. Oh well - a lesson learned.
There are other buttons on the "Media Album" menu:
* View/Edit media – Click this button to open the highlighted media item in the Edit Media dialog.
* Properties - Opens the media properties dialog. This shows you the complete path and file name of the item, and lets you add or edit caption and description, as well as date and your own file reference number for the selected item.
* Remove media – Click this button to remove the highlighted media item from the Media Gallery. You will be asked if you want to remove the selected item. Click "Remove media" to confirm you want to remove the item, or Cancel to close the dialog. If there are people, families or other items using the media, you will be told of this, and asked again if you are sure you want to delete it. If you click "Remove Media" again, the item will be deleted and the connections to people families or other items in the database will also be removed. Click Cancel to close the dialog
* Rearrange - Allows you to rearrange the order of photos in the media album. A list of the photos will appear on screen, where you can drag and drop the photo names into the desired order and click OK.
* Print – Click this button to print the highlighted image. In the Report Settings dialog:
** Print Captions (if available) – Tells RootsMagic to print the captions with the images if they are available
** Print Descriptions (if available) – Tells RootsMagic to print the Descriptions if they are available
** Choose Fonts and Layout to change the settings from the default values. (Click Reset of you want to return to the default settings.)
** Click "Generate Report" to display the image in the Report Viewer, or Cancel to close the dialog.
* Show Usage – Click this button to see who or what the highlighted media item is associated with.
From what I can tell, the media items are not "embedded" in the RootsMagic 4 database - they reside where I found them and the program links to them to show them. Users need to remember this and not change the file names or move the images out of the file folders where they reside. A user could create a separate Media file folder in their RootsMagic file folder and copy the images there and link to them from there. That way the user could move the media items around all they want, but there would be duplicate files on their computer hard drive. The RootsMagic 4 Help function says:
"When you add an item to the media album, RootsMagic does not store the item in the database itself, it stores a link to the item on your hard drive. So if you move your RootsMagic files to a different computer, you also must copy your media items to the other computer.
"If you put them in the same directory on the second computer as you had them on the original computer, the links will continue to work. If you put them in a different folder, you can use the search and replace feature to update the links."
This process was really easy and took very little time for me to add several photographs and several census images to the "Media Albums" of my grandparents.


1 comment:
Thanks for this valuable information - and for pointing out how RootsMagic 4 "links" to the media and does not embed it. My past issues with FTM include embedding media which vastly inflate the database size.
Post a Comment