I downloaded the free RootsMagic 4 beta release in early March, and purchased the program on 31 March. I easily uploaded my Family Tree Maker file to it. In this series, I'm looking at different features of RootsMagic 4. I'm not doing a comprehensive review, just looking at features important to me.
Previous posts in this series include:
* Working in RootsMagic 4 - Post 1: Navigation
* Working in RootsMagic 4 - Post 2: Editing Person Data
* Working in RootsMagic 4 - Post 3: Adding a Child to the Family
* Working in RootsMagic 4 - Post 4A: Creating a Pedigree Chart
* Working in RootsMagic 4 - Post 4B: Creating a Pedigree Chart
* Working in RootsMagic 4 - Post 5: Creating a Family Group Sheet
* Working in RootsMagic 4 - Post 6: Creating a Narrative Ancestors Report
* Working in RootsMagic 4 - Post 7: Creating a Narrative Descendants Report
In this post, I'm going to create a Wall Chart of the ancestors of my grandfather, Frederick Walton Seaver (1876-1942). In the "Family" View, I clicked on the "Report" menu item and highlighted the "Charts" option, and the "Wall Chart" item:

I clicked on "Wall Chart" and the "Report Setting" menu opened. I made Frederick Walton Seaver the selected person; I chose the Chart Type (I chose Ancestor Chart, the other choices were Descendant Chart and Hourglass Chart); I chose the Orientation (I selected Top to Bottom, other choices were Bottom to Top, Left to Right and right to Left); I chose 8 generations of Ancestors; and I checked the "Print Color Coding" box. Here is the menu showing all of my choices:

There are other buttons on this page that open menus for:
* Reset - resets all options back to before the user started changing them.
* Fonts - change font type, size, bold, underline, italics, strikeout for name, data and title. For this post, I chose Name = 12, Data = 10 and Title = 48.
* Data to Include - the user can select the name format and up to eight items to include. The "Data to Include" menu is shown below:

Birth, Death and Marriage were pre-selected. The user can select any of the other Facts listed in the drop-down box (shown above). There are also five boxes on the right to check for options. I clicked "OK" and was back to the "Report Settings" menu. I clicked on the "Background" button:

The "Background" menu permits you to select no background, a solid color background (from a palette, as shown above), or an image. I chose the light yellow background from the color palette and clicked "OK." Back on the "Report Settings" menu, I clicked on the "Boxes" button:
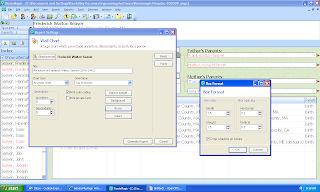
On the "Boxes" menu, I could choose the box width, box height, space between horizontal and vertical boxes. The first item greatly affects the overall size of your wall chart! I narrowed the box width to 1.5 inches and increased the box height to 1.5 inches (trust me, there was a reason for this!). I clicked "OK" and from the "Report Settings" menu I clicked on the "Colors" button:
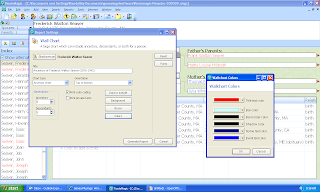
The "Colors" menu permits the user to select colors for the title text, box color, box border color, shadow color, name text color and data text color. I changed the default colors to the ones shown above. I clicked on the "OK" button and now was ready to create my wall chart.
I clicked on the "Generate Report" button and a separate window for RootsMagic Chart opened (which has its' own menu system). When it opened, I saw a blank yellow sheet. When I scrolled down to the bottom, I saw this:
This is a 100% zoom level for the chart. The overall chart measures 140 inches wide and 17 inches high (see why I wanted to limit the box width?).
The user can go to the "View" menu and select from options of "Zoom Percent" (50%, 75%, 100%, 200%), "Zoom Custom" (the user inserts the zoom percentage) or "Zoom to Fit."
I selected "Zoom Custom" = 30% and the chart showed:

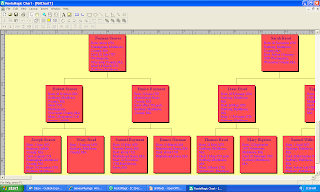
I clicked on the "Zoom to Fit" item and saw:

As you can see from the charts above, I got the yellow background I requested, but the box background came out reddish even though I chose a light blue. I tried many colors and couldn't make the box background color change. It's probably a bug that can be easily fixed. The other colors and text were as I specified.
The menu system and options are easy to use and navigate. The "Report Settings" for all reports and charts are essentially the same, so the user doesn't have to learn a lot of menus to get things right. The learning curve on the Reports and Charts is really shallow, I think.
The menus and icons on the RootsMagic Chart program permit the user to add text boxes, lines and shapes wherever the user desires.
The user can save the chart in File>Save As as a RootsMagic Chart file (.rmc) - my 8 generation chart was 264 kb in size. I could not do a File>Export because the RootsMagic Chart program I have is a demo version (does it cost more to download it separately? Or is this feature not working yet?).
What else would I like to see in the Wall Chart option?
* Ability to change box outline design
I looked for Chart Printing options and the http://www.rootsmagic.com/ web page has a link to http://www.printmychart.com/ where the user can purchase a chart.

On the "Boxes" menu, I could choose the box width, box height, space between horizontal and vertical boxes. The first item greatly affects the overall size of your wall chart! I narrowed the box width to 1.5 inches and increased the box height to 1.5 inches (trust me, there was a reason for this!). I clicked "OK" and from the "Report Settings" menu I clicked on the "Colors" button:

The "Colors" menu permits the user to select colors for the title text, box color, box border color, shadow color, name text color and data text color. I changed the default colors to the ones shown above. I clicked on the "OK" button and now was ready to create my wall chart.
I clicked on the "Generate Report" button and a separate window for RootsMagic Chart opened (which has its' own menu system). When it opened, I saw a blank yellow sheet. When I scrolled down to the bottom, I saw this:

This is a 100% zoom level for the chart. The overall chart measures 140 inches wide and 17 inches high (see why I wanted to limit the box width?).
The user can go to the "View" menu and select from options of "Zoom Percent" (50%, 75%, 100%, 200%), "Zoom Custom" (the user inserts the zoom percentage) or "Zoom to Fit."
I selected "Zoom Custom" = 30% and the chart showed:

I clicked on the "Zoom to Fit" item and saw:

As you can see from the charts above, I got the yellow background I requested, but the box background came out reddish even though I chose a light blue. I tried many colors and couldn't make the box background color change. It's probably a bug that can be easily fixed. The other colors and text were as I specified.
UPDATE: Reader RootsMagic commented that I requested "Print color coding" in the "Report Settings" menu. This branch of the family was selected to be "pink" so it looksl ike the color coding overrides the user request for a different box color.
The menu system and options are easy to use and navigate. The "Report Settings" for all reports and charts are essentially the same, so the user doesn't have to learn a lot of menus to get things right. The learning curve on the Reports and Charts is really shallow, I think.
The menus and icons on the RootsMagic Chart program permit the user to add text boxes, lines and shapes wherever the user desires.
The user can save the chart in File>Save As as a RootsMagic Chart file (.rmc) - my 8 generation chart was 264 kb in size. I could not do a File>Export because the RootsMagic Chart program I have is a demo version (does it cost more to download it separately? Or is this feature not working yet?).
What else would I like to see in the Wall Chart option?
* Ability to change box outline design
* Ability to change line weights and colors
* Some nice family tree and nature scenes for backgrounds.
I looked for Chart Printing options and the http://www.rootsmagic.com/ web page has a link to http://www.printmychart.com/ where the user can purchase a chart.
UPDATED 4/8/09: added an update to one of my comments about the box colors - the reader was correct!
I still cannot get RootsMagic Chart to export a file. There is no way to register it from the program. I have registered my RootsMagic 4 program. Any suggestions?
3 comments:
Randy, you had the checkbox marked to print the color coding.
You said you had purchased the program yet you said you are running the demo version.
Why? If you own it and enter your registration code then you can export the file. The export is disabled on the demo version.
Randy,
I tried to leave a comment earlier but was cut off at the pass by the mobile technology fairy :-).
www.printmychart.com comes to us at Generation Maps so you know you will get a high quality print without alot of hassle. We partner with most of the genealogy software companies for their printing services. That means that you can send us any kind of file, the.rmc, or whatever kind of output you want to select. You can even just send us your RootsMagic file directly and just tell us what you want it to look like and we can format it for you. We have 7 kinds of paper now, everything from inexpensive typing paper to vinyl to canvas giclee fine art reproductions and archival or non-archival ink. So you know it will be done just the way you want it.
We'll take good care of you when you are ready to print. Thanks Randy.
Janet Hovorka
Post a Comment